Level Modding
Templates
to-do: Talk about templates for Blue/Purple rifts, Gameplay 1, and that one flat map i forgot its name (its 1 am lol)
Player Start
to-do: talk about spawning points
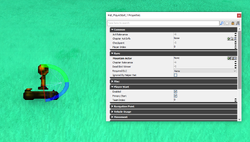
PlayerStart is where the player will spawn when loading into the level. As such it's one of the more important actors when making maps. There are several properties you can edit in the PlayerStart actor.
Act Relevance: Set it so the player will spawn on this specific PlayerStart if the Current Act number is a certain number.
Chapter Act Info: Setting it will also grab the Current Act number related the Chapter Act Info.
Checkpoint: Sets the PlayerStart's Checkpoint ID Number. For Example, if you reach checkpoint 1 and die, and this playerstart's checkpoint id is set to 1, then the player will respawn to that playerstart.
Primary Start: If you're wanting to create checkpoints, you need to tick this off in order for the player to respawn at this specific playerstart.
Player Index: It's best you leave this alone, from testing it doesn't seem to do anything as of writing this.
Optional Properties
Mountain Actor: Mainly used for Chapter 4 Alpine Skyline, This will set the MountainInfo Actor in the level to be associated with. You don't have to worry about this part unless you're planning on utilizing the MountainInfo Actor.
Chapter Relevance: Mainly used in the Spaceship Hub where the player would spawn if you were returning from a specific Chapter.
Dead Bird Winner: Used for Chapter 2 Battle of The Birds, will spawn the player here depending who won the awards at the end of the chapter. For Value reference, 0 for undecided, 1 for Conductor, and 2 for DJ Grooves.
Required DLC: Checks to see if you have a specific DLC in order to spawn the player here.
Ignored By Helper Hat: Only used in Chapter 7 Nyakuza Metro, mainly because helper hats in that chapter point towards those PlayerStart Actors.
Team Index: Probably a leftover of the Unreal Dev Kit so you can ignore that.
Checkpoints & Current Act
to-do relevant because checkpoints are also player start & also Current Act number
To create Checkpoints you can place down another Player Start and move it to where you want the player to respawn. In the PlayerStart properties window make sure to uncheck Primary Start.
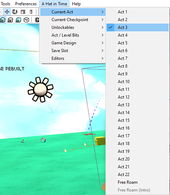
For testing either the Current Act Number or Checkpoint ID, select the A Hat in Time drop-down window at the top of the main editor window. From there you can select Current Act or Current Checkpoint and change the ID Numbers for them.
For changing Checkpoint ID in-game there's two ways you can do that.
Method 1: CheckpointVolume
Method 2: Using Kismet to change
The method we're going to be doing is Method 1 because it is the easiest way for setting checkpoints to newcomers.
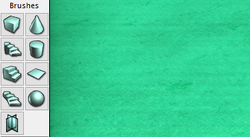
On the left side of the main editor window there are tabs for brushes and volumes. In order to make a volume we need to create a brush first. Select any object in the editor viewport, for this section we're going to be selecting...
still need to explain how to create volume but im tired, sorry.
Movable Platforms
Matinee
Collectibles
Actors
Enemies
Pylons
Time Piece
| Mods | |
|---|---|
| General | Modding Introduction • Uploading Mods Guidelines • Language Pack • Asset Replacement • Help and Resources |
| Editor | Content Browser • Actor Browser • Level Modding • Kismet • Matinee |
| Scripting | Scripting Introduction • Game Mod • Player • HUD • Abilities • Status Effect |
| Guides | Playable Characters • Title Screen Replacement |


