Award Ceremony


Though, it could use some more work.
We'll also need a couple pictures in the summary, as well as gallery.
Award Ceremony is Act 6 of the second Chapter: Battle of the Birds, as well as the Chapter's Finale. In this Act, Hat Kid attends the Award Ceremony for Annual Bird Movie Award after deciding the winner based on the scores of acts 2, 3,4 and 5. Murder on the Owl Express and Train Rush boosts The Conductor's score, while Picture Perfect and The Big Parade will boost the score for DJ Grooves.
Fakeout

After finishing all regular acts of Battle of the Birds, Hat Kid has now starred in two of each directors' movies. Based on her performance in a movie led by the corresponding director, a score will be assigned to it, which will add up to a total score on that director's side. The director with the higher overall score will earn to himself that year's Annual Bird Movie Award.
Upon selecting the Finale, a prompt will show up, asking Hat Kid if she's really sure to congratulate the winning director. If she says yes, another prompt will come up, making an excuse to convince her not to do so. If she declines, Hat Kid has the freedom to revisit the movies, and try to perform better to alter the results.
Entering the Finale, the winner can be seen on a stage, thanking his audience. When Hat Kid talks to him, depending on who won, the interaction can be a bit different. If the Conductor was the winner, he'll tell Hat Kid that her contribution to his victory was small and insignificant, and that she could sell her reward for dimes and nickels on eBird. If DJ. Grooves won, however, he'll thank Hat Kid for what she's done for his victory, and just being grateful for her contribution. In either case, the winner will give Hat Kid the sixth Timepiece of Chapter 2 with seemingly no additional catches, making for a rather anti-climactic ending.
Expecting more, a very disappointed Hat Kid returns to the Spaceship. The music sounds a little off, but that's probably just due to her mood. Just as she was about to leave the Machine Room however, the telephone rings.
Somebody is calling.
"..."
"The Annual Bird Movie Award was rigged. It was an inside job."
"The Winner knows about the power of the Timepieces. He's been keeping one, and he's going to break it."
"The truth lies buried underneath Dead Bird Studio. What goes on in Dead Bird Studio when no one is around?"
"Blow the cover on this thing."
٭CLICK*
Infiltrate
After the ominous call, Hat Kid returns to the telescope, with Act 1 - Dead Bird Studio now highlighted, and having a question mark at the end. Upon entering the act, Hat Kid will stand at the entrance of Dead Bird Studio, but this time, it's dark outside. Many cars are still parked however, hinting that something is really off. The music is also different, now a slower arrangement of the track Dead Bird Studio, with much fainter melody, leaving only a quiet drum-kick for the majority of its duration, as well as a long, distorted section. Topping it all off is the howling wind, and an echo effect to all audible noises.
All that aside, the studio is closed, no obstacles will function, allowing for relatively easy traversal. Dropping from the vent, empty film sets lay still, now that nobody is around, and all electronics are turned off. Unlike in her first time here, Hat Kid will not have to maneuver around any watchers, nor cameras. The first moving platform will not function, so Hat Kid will have to make the leap to the train heist set herself. Walking alongside the platform, into a sheltered room, Hat Kid will meet a dead end, as the moving platform that takes her to the next section of the Studio is disabled. This forces her to enter the elevator in the middle of the room, which was inaccessible before.
A new titlecard will load in, with the text being "Award Ceremony".
B1

Like all good games, a long elevator ride scene will play out. Through the iron bars, different parts of Dead Bird Studio's basement can be seen as the elevator descends and descend, giving Hat Kid an idea of what she's gotten herself into.
Hat Kid will stop doing her finger gun idle animation. Things are about to get serious.
The elevator opens, Hat Kid will see herself in a water-damaged, concrete facility. Walking through the hall, "B1" can be seen on the wall. Right after is a shelf with boxes inside, and two active cameras blocking the way. Hat Kid will have to double-jump and climb to the top of the shelf to progress. Dropping down from the shelf, it's a dead end with piles of paper, so she'll have to get back up and balance on a wire in order to progress. Jumping on a blue platform over the wall, Hat Kid will drop down to another pile of paper. They're seemingly unpaid bills, indicating that the Studio is going under a rough financial situation.
Walking down a stairway, Hat Kid will get out of the shelter to a large area with high ceiling. Walking past some signs, she'll meet another dead end. This forces her to maneuver on wires and pipes above a bottomless pit to progress.
After jumping from wire to wire, Hat Kid can be launched up to a concrete platform via a spring board. Here, she can hear muffled voicelines of the Winner, talking about the Timepiece he's keeping. Making her way on top of some crates, Hat Kid will end up on top of a sheltered room, with a walkway extended out that leads to a yarn. Going the other way, she can jump on top of some pipes, and get to a catwalk higher up. Some hookpoints will hang out at the end of the catwalk, allowing Hat Kid to swing to the other side of the room.
She'll end up on a platform at the top of the room. Here, shelves filled with movie tapes can be seen, in which none of them Hat Kid has heard of. Their titles are all bird puns.
Inbetween the shelves is the door leading to B2.
B2
Entering B2, towers upon towers of crates and boxes are the first thing Hat Kid can see. Many of them are interactable, describing what their labels say, in which most of them are references to common terms in movies and TV series. To progress, Hat Kid will need to find a box labeled "Jonbar Hinges". A Sprint Yarn can be found right up ahead on a high platform, and if Hat Kid continues going forward, a box labeled "Red Herrings" can be found. This is poking fun at her for going in the wrong direction. However, that's aside the point. Turning left at the Jonbar Hinges box, Hat Kid can jump on crates that act as elevated platforms to ascend through B2. If the No-Bonk badge isn't equipped, some dive-cancel timings are required to wallrun up the towers of crates. After jumping on a spring, dropping to a lower platform and going up again via bouncing on a sandbag, a pon cluster can be found on a rope. It does not give any special rewards, but getting more pons wouldn't hurt. Going over some more platforms, another labeled box can be found. This one is "ticking clocks", in which Hat Kid, upon reading, will think of an advanced one, and shiver. This is supposedly not referencing anything, but the fact that ticking clocks will be a part of this mission. Here, the muffled voice of the Winner can be heard again.
Moving forward, a railing can be seen poking out from a ledge. Hop up to it, and enter the big entrance to another room. The next room of B2 is filled with metal scaffoldings, and has a green power plate in the middle, as well as red wires going out from a power box. Stepping on the green power plate, it will be activated, and the camera pans to the left, locking on a springboard. Bouncing up to a platform, Hat Kid will have to make a leap to the platform with steel mesh and a camera. After going behind it to avoid being spotted, a table of CAW Agents can be seen. They'll be telling... Jokes???? Regardless, when they laugh, Hat Kid will have an opportunity to quickly get on top of their shelter, and avoiding them. Climbing onto some steel beams, a platform with footprints can be seen. On it is the second power plate. From here, Hat Kid can go in two separate ways. It is recommended to get down to the platform with a camera first, and follow the red wire to another power plate, as this route contains 2 Heart Pons, which is immensely useful if Hat Kid is hurt. Be careful of the Moon Penguin strolling around on the platform above the first Heart Pon. After activating the power plate, jump down to the previous power plate, and look to the right about 45 degrees. An extended wooden ledge can be seen, which Hat Kid can use to dive to a platform ahead. Three falling platforms are right next to it, jump through them quickly, and wall-run to the final power plate. From there, it would be safer to maneuver down from the top to avoid fall damage instead of immediately dropping down, as there won't be many Heart Pons in B3. Head onto the darkness ahead, to enter B3.
B3
The final floor before the confrontation.
Entering the floor, a static screen in front of many seats can be found. Hat Kid will be standing between two parallel walls, which can be used to wall-jump up to a catwalk above. If needed, to the left side of the room is a Heart Pon. Either way, an entrance can be found on the right, which leads to the underground production facilities. 2 cameras will be blocking the catwalk, so Hat Kid will have to drop down to move past them. At the end of the hallway are some crates, which can be used to get back onto the catwalk, bypassing the cameras below. Dropping down again, a door is open to what seems like DJ. Grooves' room, in which posters to his movies can be found. Another door is right next to the first, which Hat Kid can go through, and progress. However, she can climb up to an elevated walkway above the mirrors, and enter DJ. Grooves, presumably, bedroom. The room is painted with black and magenta, alongside with golden trims. In the middle of the room is an excessively gaudy bed, and in the corner is an equally excessively hand-dryer. Around the room are mountains of trophies, possibly being Grooves' collection of awards he never really won. On top of a trophy tower is a comically large key, which can be collected via jumping from the top of the bed.
Exiting the room to the hallway, the winner's muffled voice can be heard, for the last time. A Sprint Yarn is up ahead, in the greenscreen room, past the first open door. To grab it, jump on top of some crates, and onto the paper rocket. Balancing on the wire will lead Hat Kid to the Yarn. Going back to the first door, is a room with wooden shelves and boards. A camera blocks the way, so Hat Kid will have to climb on top of the shelf to the right and go above it. Another hallway is ahead, this one with two whiteboards. the first one has a drawing of Mustache Girl, with the text "Mu was here", and "Hat Kid Smells". To the end of the hallway is the second whiteboard, likely belonging to one of the directors. To Hat Kid, it "looks like ramblings of someone very close to running out of movie ideas", and that there is more than 7 instances of the word "reboot" on the board. Entering the next room, many cameras and posters of the Conductor's films can be found. In order to get through, Hat Kid will need to use the hookshot to go above the cameras, swinging to the top of a cabinet full of trophies. An open vent is right above, which Hat Kid will need to go through. The room up ahead has even more posters for Conductor's movies, in which Hat Kid comments to have "Turned out pretty well". That aside, a line of sandbags can be found inside this room. Hat Kid will have to use some of the outfit hangers to reach them, and progress to a vent that leads to the catwalk outside.
Following a trail of Pons, a room with a pit leading down to some spinning fans can be found. a glass panel is blocking the way, so Hat Kid will have to drop off a bit and double-jump or dive ahead, climbing on the wall to get to the other side and avoid the fans below. Exiting the room, Hat Kid will end up at the second hallway, where the greenscreen room and DJ. Grooves' room can be found, but now she's on a catwalk. An open vent is right there, serving as a one-way drop. So if the key hasn't been collected, now's a good chance to do so. Dropping down, a locked door can be found. Hat Kid can use the key to open the door, which will reward her with a relic inside. Though, if she hasn't collected the key, the level can still be progressed through, as the elevator leading to the final section of Award Ceremony is on the opposite side of the room.
Entering the elevator, a new titlecard will load in, depicting the winner on a stage.
Confrontation

Down one final elevator ride, Hat Kid will end up at an underground stage, with the winner on it, and his crew on the side. He explains to Hat Kid that the Timepiece is all his, and that he won't give it up without a fight.
Although the winner might not be the same for everyone, the battle will be mechanically identical. As their attacks have little distinction from eachother, and even their hitboxes are the same, bigger DJ. Grooves size. Unlike the bosses of Chapter 1 and 3, the director will not turn blue, but will be vulnerable whenever Hat Kid can approach and smack him in the face. The fight will get harder as it progresses, being soft-divided into three phases, with the director taking a total of 23 hits before being defeated.
In the first phase of the battle, The Director has four unique attacks: a dive-bomb from the left or right balcony that aims directly at Hat Kid; whistling for stage lights to fall onto the arena; jumping down from the stage for a wrestling-style slam; and dropping down on a disco ball that sends out a shockwave.
As the battle progresses, The Director gains extra attacks: darkening the arena as he charges at Hat Kid with a knife; rapidly stabbing the air while slowly approaching Hat Kid; and calling upon cars to circle Hat Kid, then jam into each other in the center of the arena. On top of the Disco Ball Drop being able to fakeout with a delayed fall, The Director can create photo copies of himself to magnify the effects of both the knife charge and the disco ball drop. The slam attack is gone at this point, and the balcony drop is also absent.
Halfway through the fight, the stage will black out. A Bird will appear on the stage with a piano, playing the tune "Heart to Heart". A table will appear in the middle of the arena, with The Director inviting Hat Kid to sit down, as he wants to have a "Heart To Heart" with her.
if The Conductor won
Upon sitting down, The Conductor will reveal to her the purpose behind his desire to keep the Timepiece. Being that he wants to right the loss that was "Annual Bird Movie Award #42", in which DJ. Grooves won. Hat Kid can either tell him "Maybe" or "Nope" when prompted if he could keep the Timepiece. If Hat Kid says "Maybe", he thanks her, but then declares that she cannot leave the room without dying because he cannot risk DJ. Grooves finding out he cheated. If Hat Kid says "No", he will tell her that she is a greedy young lass, and that she was going to have to take it from him by force.
if DJ. Grooves won
Sitting down at the table, he will tell her that the reason why he wants to keep the Timepiece. In which, it's because he thinks The Conductor cheated his way to getting all the previous trophies, and that he wants them back to their "rightful" owner - himself. Hat Kid can either tell him "Maybe" or "Nope" when prompted if he could use the Timepiece. If she replies with "Maybe", he thanks her, but tells her that she cannot leave the room without dying, because he cannot let the Conductor find out. If she replies with "Nope", he will tell Hat Kid that she is persistently selfish, and that she is going to have to take it from her.
Either way, The Director will proceed to strap a bomb onto Hat Kid, giving her a 80 seconds time limit before she explodes.
The Director will continue to attack Hat Kid with a new set of moves: taking out large sawblades, and sliding them across the floor in sets of three (one aimed directly at Hat Kid, with the others slightly to the left and right); jump up to the balcony to toss out several sets of sawblades, before doing the balcony drop from the first phase; and running around the arena, taunting Hat Kid about how the bomb will explode soon. Hat Kid now needs to smack him a couple times, before the losing director steps in, saying he will find a way to defuse the bomb. After attacking him some more times, The Loser will put out a defuser, and direct Hat Kid over to him so he can cut the bomb's fuse. When this is done, both the bomb and the timer will disappear, saving Hat Kid's life, and finally allowing her to defeat the sore winner.
The Battle enters its final phase. In frustration of the bomb being defused, The Director will send four knife-wielding parade owls to follow Hat Kid around, in an attempt to stab her. Most attacks gained leading up to the second phase are absent, with The Director doing the attacks from the first phase, with the knife swinging attack additionally. Upon taking six more hits, The Director will be defeated, falling unconscious on the floor.
The Timepiece will appear, allowing Hat Kid to take it, ending the story of Battle of the Birds for real.
Strategy
- As most of the level require a considerable amount of vertical traversal, the Hover Badge is recommended, to prevent accidents from falling.
- B2 & B3 sometimes require Hat Kid to dive-cancel into walls and wall-run. Therefore, to make things easier, the No-Bonk Badge is also recommended, as with it, Hat Kid can dive straight into a wall and automatically perform a wall-run without having to cancel the dive.
- In conclusion, the ideal loadout should be Hover Badge, No-Bonk Badge and Hookshot Badge.
- During B1, navigating through the wires could be quite challenging. By jumping a couple times on a wire when it's stretched can give Hat Kid considerably more height, allowing for easier alignment.
- Furthermore, it is discouraged to dive, or dive-cancel into wires, as the timing is much more awkward and difficult.
- From B2 onwards, many cameras and watchers can be in unexpected spots. The Camera Badge is recommended to investigate what's ahead, before heading on.
- On the second room of B2, following the red wires will lead Hat Kid to an unactivated power plate. If she's ever lost, this would be very useful.
- It's easy to get lost in B3, so taking distinguishing features of certain rooms/hallways in mind would be a good idea.
- In the boss battle, it is recommended that Hat Kid equip a different loadout of badges.
- When damaged, the director will often drop Heart Pons. Therefore, the Magnet Badge is recommended for easier collection.
- Using Hats will make the battle a lot less difficult. With this in mind, the Fast Hatter Badge is recommended.
- Sometimes, when Hat Kid dives, she can bonk into the stage, or the elevated platforms on the two sides. The No-Bonk Badge can be used to prevent this.
- With this information, the ideal set of badges should be No-Bonk Badge, Magnet Badge and Fast Hatter Badge.
- In the boss battle against the director, try to be in the air for as long as possible during his attacks. As he does not have anything to combat against an airborne opponent.
- With this in mind, the Sprint Hat is not recommended. As Sprint-Jumps will nullify Hat Kid's double jump.
- The Dweller Mask and Kid's Hat are also not recommended, as they serve no particular purpose in this battle.
- If dodging isn't a problem for Hat Kid, the Brewing Hat is recommended for quick damage.
- Charging up an explosive when the director is performing his attack animation, and throwing it right when the attack window is open makes for easy damage, as the Explosives from the Brewing Hat has homing capabilities.
- If dodging is too difficult however, the Ice Hat is recommended instead. As Hat Kid will gain two invincibility hits in her ice statue state.
- This is especially useful in the first & second phase of the battle, as virtually no attack, except the disco ball, can damage Hat Kid when she's an ice statue.
- Though, in the final phase with the owl band, use of the Ice Hat is discouraged, since losing mobility will put Hat Kid to a painful death.
Diary Entry
After each act, Hat Kid will write her thoughts in her diary, which can be found in her pillow fort, under the mountain of pillows. The diary will only display the entry for the last act that was completed.
"I'm so excited! There's going to be a big fancy awards show and I get to go! I mean, I think I'm excited! I mean... I wonder if I helped the right bird win?"
"All the birds were really nice and the movies were sooo cool! So... I just... wonder... ANYWAY, I'm super excited to see the award! Oh, also the Time Piece, hehe."
After clearing the true Award Ceremony, there is another entry;
"What is it with people on the planet double-crossing me? It's ruuuuude!"
"That's the last time I get involved in show business for a long time."
Music
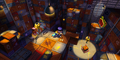
- The Annual Bird Movie Award - This track plays in the fakeout sequence, when Hat Kid attends the Award Ceremony.
- The Phone's Ringing - This song plays when Hat Kid receives the mysterious phone call.
- Dead Bird Studio is Closed - An arrangement of Dead Bird Studio, with much fainter instruments, and a lower tempo. This song plays when Hat Kid sneaks into the surface floor of Dead Bird Studio at night.
- Dead Bird Studio Basement - A stealthy, mysterious track, made up entirely by leitmotifs of "Dead Bird Studio". This song plays when Hat Kid is sneaking through the basement floors of Dead Bird Studio.
- Heart to Heart - a calm track, primarily utilizing the piano. This song plays in the Heart-to-Heart sequence of the final battle.
- The Battle of Award 42 - an intense metal track, getting faster in the middle, and shifts into a swing-y section towards the end. This track includes leitmotifs from earlier tracks in the chapter, such as "The Conductor's Train", "The Big Parade", or the boss leitmotif of A Hat in Time. This track plays in the final battle against the winning director, with the 3 distinct sections being 3 phases of the battle.
Achievements
Below is the list of achievements related to this act;
| Image | Name | Description |
|---|---|---|

|
Dead Bird Studio - All Clear! | Collect Every Timepiece in Dead Bird Studio! |

|
One Punch | Defeat any boss with the 1-hit hero badge equipped! |
Gallery

The first titlecard, used in the fakeout sequence.
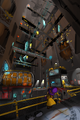
The second titlecard, used in the infiltrate sequence.

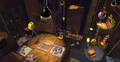
The third titlecard, used in the battle against DJ Grooves.

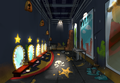
The fourth titlecard, used in the battle against the Conductor.
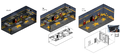
Concept art for B1.
Concept art for B2
Concept art for B3.
Concept art for B3's hallways.
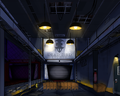
Concept art for the first room of B3.

Concept for the Club of 20 Grooves, later repurposed as the fight arena.
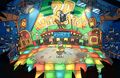
Concept for the Club of 20 Grooves, later repurposed as the fight arena.


Trivia
- In the ominous phone call on the spaceship, the last sentence will be "Blow the cover on this thing", followed by either "Darling" or "Lassie", depending on who won. This confirms the identity of the person behind the phone call, being the director who lost.
- When Hat Kid arrives back on the spaceship after the fakeout sequence, a slow, distorted arrangement of Her Spaceship will play out.
- The first Timepiece of Award Ceremony plays a subtly altered version of the jingle, foreshadowing the fact that there are still more to uncover.
- In B2, many of the crates and boxes can be examined, with the dialogue text describing what their labels read out.
- Terms listed include: MacGuffins, Red Herrings, Chekhovs Guns, Jonbar Hinges, Framing Devices, and Ticking Clocks.
- The inspection text of the Jonbar Hinges crate reveal that all that's inside is a magnet and a pebble, as seen through cracks on the box by Hat Kid.
- This is a direct reference to The Legion of Time, which is where the term Jonbar Hinge originated from.
- In the B3 Dressing room with DJ. Grooves' posters, the one for The Big Parade is a parody of the iconic poster for the film West Side Story.
- In DJ. Grooves' bedroom on floor B3, a total amount of 321 trophies can be found.
- On a whiteboard in B3, a drawing by Mustache Girl herself can be found. This is the only instance where Mustache Girl's presence can be found anywhere outside Mafia Town or The Finale.
- During the bossfight, the bomb's countdown is actually much longer than the 80 seconds initially shown on the timer. After the first 50 seconds, the timer begins to slow down, giving Hat Kid an entire two minutes to get defused.
- Muffled voices of the winner can be heard throughout Hat Kid's infiltration. With the music and sounds on top, they're almost illegible. But through research magic, here are every voicelines that can be heard:
- Conductor:
- "I Kept this Timepiece compleeeeeeetely... secret. *shhhh* The Lass doesn't know about it! No one told 'em, right? Good! She's got plenty. She won't need this one!"
- "CRUSHET!" C'MON, WHATA YER CHECKIN?! JUST HAMMERET! Oh! Wait! Will the juice fall out? WE NEEDA JUICE!"
- "ARGH! MAYBE WE SHOULD BLOW IT UP! I've gotta bomb from Train Rush here! Ah, should I use it? Wait... Maybe I should save it in case someone shows up! Ehehehehe...!"
- Grooves:
- "I kept this Timepiece just for myself! The little darlin' girl doesn't even know it exists! I don't think she'll miss it. She's got so many!"
- "I remember seeing these Timepieces a looong time ago! And I knew I couldn't pass off the opportunity to crush one!"
- "Oh! I think we should just smash it, darling! Although, maaaybe all that magic Time juice is just gonna escape from us."
- Conductor:
- Based on the interactable objects around the basement, there appears to be problems afoot at Dead Bird Studio. There are piles of unpaid bills, considering they blow up trains every other week, and there aren't exactly many cinemas on Earth, it's not gonna go well for them. Furthermore, a whiteboard inside B3 can be interacted with, which Hat Kid comments to look like ramblings of someone who's running out of ideas, and there are more than 7 instances of the word "reboot" written. It seems like Dead Bird Studios are struggling both financially and productively.
- When interacting with the movie posters in B3, Hat Kid will realize that she has not given the directors permission to use her image, and she doesn't recall signing any form of paper or contracts either. It's likely she isn't getting paid.
- In the room with the relic, a warning sign can be found, with very small text. Zooming in with the camera badge, a message from Koidrake - concept and 2D artist for A Hat in Time: "You're a silly goose for zooming in! This is no yolk. I'm warning you! Fine! Who cares, do I look like I give a flock?"